We talked about why you might start a blog. Now let’s talk about the “how.” Let’s say you want to use the popular WordPress blog platform (self-hosted). Once you have a domain name and Web hosting account set up, you need to install WordPress before you can customize it for your new site.
Some hosts give you an easy way to do this, through Fantastico or other automated installation options. It may be quicker, but sometimes these options don’t let you customize things as much as you’d like (such as automatically naming your databases something confusing like WP6 instead of something tied to your site’s name — a potential problem if you run multiple blogs).
Fortunately you can install WordPress manually. It’s a simple process. Here’s how (based on their famous 5-minute install).
Quick Steps to Install WordPress Manually
1. Download WordPress. You can get it from WordPress.org and unzip the files to your hard drive.
2. Set up a new database and create a database user. Or you can attach an existing user to the database. Give the user full permissions to access and control the database. You’ll do this from your Web hosting account’s control panel. They should have a link that lets you create and manage databases on that control panel homepage somewhere — look for a section on MySQL databases.

Example of where to add databases using a cPanel host
3. Edit and rename your configuration file. You’ll find a file in your downloaded package called wp-config-sample.php. Rename it to wp-config.php. Then open the file in your plain text editor (like Notepad in Windows) and edit the file to reflect your new database information. You’ll add your database name, database username, and password where requested. Save the file.

Edit these three sections of your wp_config.php file.
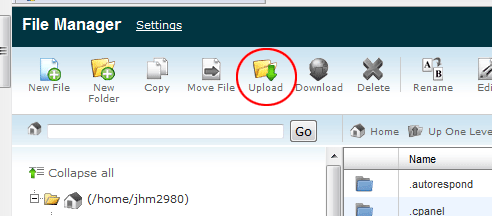
4. Upload the WordPress files to your server. You can use an FTP program or upload through your host’s file manager. If you want your blog to appear on your main domain name (ex: www.YourSite.com) then upload the files into the root folder for the domain. If you want the blog in a sub-folder (ex: www.YourSite.com/blog/) then create that folder in your host’s file manager and upload your WordPress files to that folder.

Example "upload" option in a file manager for a cPanel host
5. Run the installation script. You can access the installation script by going to http://www.yoursite.com/wp-admin/install.php (if you installed your site on the main domain) or http://www.yoursite.com/blog/wp-admin/install.php (if you installed it in a “blog” folder — basically go to the URL of your new blog and add “/wp-admin/install.php” to the end).
That’s all there is to it. It really is a simple process to set up WordPress manually if you’re even vaguely familiar with setting up websites or other content management systems. If you’re not, don’t worry. You can still get through it, even it takes a bit longer than the five minutes they estimate. Consider it an incentive to launch additional blogs. After a few more installations, you’ll pretty much become an expert! When you’re ready to log into your new WordPress installation for the first time, just visit http://www.yoursite.com/wp-admin.
*Note: You should substitute your own domain name for all instances of “yoursite.com” in this tutorial.


No comments!
There are no comments yet, but you can be first to comment this article.